Customizing your t-shirt on the Tees2urdoor.com is a breeze. It is one of the easiest processes you can do online, and we’ll take you through the various types of customization options that some of our t-shirts offer – with screenshots!
Not all of the t-shirts can be customized in exactly the same way. The type of cotton/synthetic blends, where the seams are located, and other variables factor in to the options that we’ve offered when you want to personalize your t-shirt.
Did you notice the pink “Chat” button on the right side? If ever in doubt, don’t hesitate to chat us your questions!
Let’s first take a look at some of the more basic customizations so you get a hang of the process and then move on to apparel that offers more personalization options.
The key to using the customization options on the Tees2urdoor website is to ensure that you complete each of the steps in order.
In other words, when you are in the product page, ensure that you open each field, starting from the very top and going down. Select one answer from each of the drop-down menus.
Reason being: if you skip one step it may not allow you to move to another customization option. That’s all.
Step 1. Select shirt size
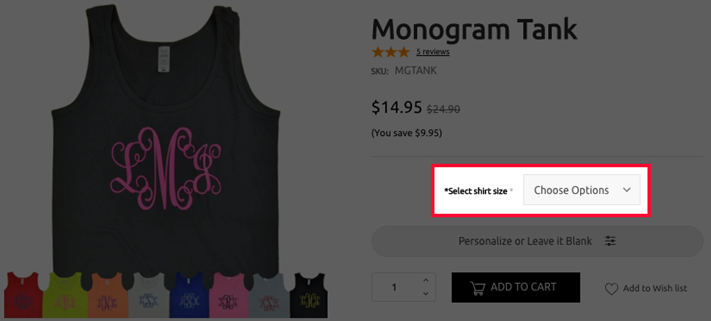
Let’s say you entered Tees2urdoor.com and out of our selection, you liked the Monogram Tank in the picture below. The temptation is to rush to see the “Personalization” button, but the system won’t let you move on until you do step 1, which is “Select shirt size.” Simply click on the menu button that says “Choose Options” and pick your shirt size.

Notes: Refer to the size charts that you see right below the image of your preferred t-shirt. We strongly recommend that you also read the product description on the middle-right column because occasionally we will give hints about the fit of each specific t-shirt. For instance, some t-shirts are made of a cotton material that is softer and more relaxed, or if they are not pre-shrunk it may shrink a bit, or it is from a brand that tends to run larger or smaller than most other brands. These hints are meant to help you be as satisfied as possible with the fit.
Step 2. Choose whether to personalize it or leave it blank
Now you can enter the personalization settings, but personalization is completely optional. However, in some cases you would end up with a blank t-shirt. And since personalization is included in the price (we don’t charge extra), then go for it!
Click on “Personalize or Leave it Blank” and in this case with this tank top, the only customization available is the monogram print in the center.

The logo must be 3 letters, usually initials: First, Middle, Last name. However, you can choose any 3 letters that mean something to you. They will be printed in the font displayed in the customization fields. Sometimes there is an optional art deco, sans-serif font (without “feet” or “curly ques”).
Sometimes our design shop can let you play with the colors –try it out, it’s fun!- and the initials to approximate immediately what the t-shirt will look like. One of our patriotic colors t-shirt (note the change in colors and text in the image below) allows you to do just that, live:

Step 3. In more complicated tees, choose your customizations in the order listed.
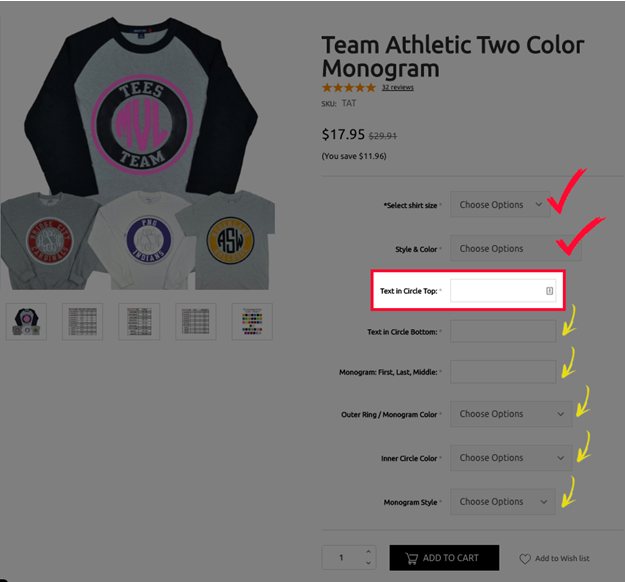
In this team athletic two-color raglan tee, for instance, there are 3 different areas where you can change the text. Go one by one, in order, as per the yellow arrows.

Note: while some t-shirts offer more visualization options, the complexity of some t-shirts may not allow visualization of all of the options.
Step 4. The exciting part: Add to Cart and Checkout
You’re almost at the finish line! Choose the quantity you want by clicking on the menu at the bottom (the default is “1”). If you want more than one of the exact same tee with the same exact customizations, just click on the quantity you want.
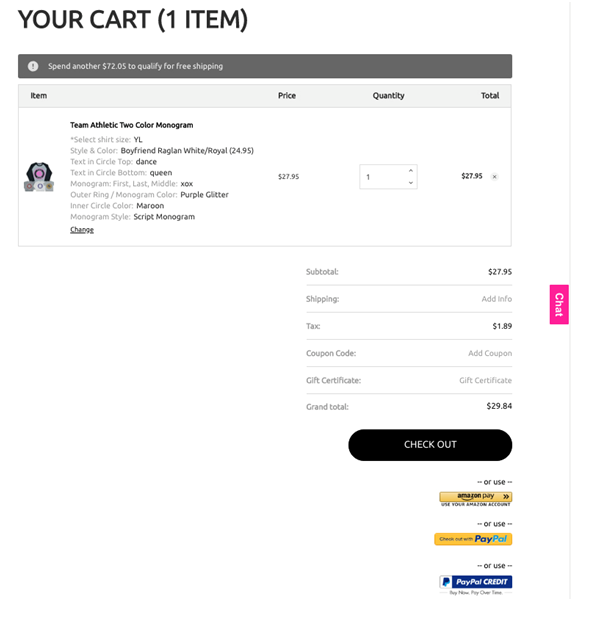
Finally, click on the big “ADD TO CART” button next to it, which will open a pop-up screen that lists the specifications of all of your customizations as well as various payment options.
Payment options include:
- Credit Card (Proceed to checkout button)
- Amazon Pay
- PayPal or PayPal Credit
What if I want to personalize each t-shirt, but using one of them as a base?
What if I want 2 or more of one t-shirt in particular with different customizations? Easy. This t-shirt is already “saved” in your shopping cart. To create another t-shirt with different customizations, just click the “x” on the top right part of this pop-up screen, make the changes to the customization fields for the 2nd t-shirt, and click on “ADD TO CART.” You will now see that it reads “2” t-shirts.
Oops! I Changed My Mind. How Do I Make Changes?
Want to change your customization to one of the t-shirt? Don’t worry, if you want to change something, you can simply click the “x” on the top right part of this pop-up screen and the pop-up screen will disappear, returning you to the customization fields where you can change your choices.
Once you’ve made your changes click on “ADD TO CART.” This will now show your cart as having 2 t-shirts, which is ok! You do not have to pay right now and we will delete the first t-shirt from the cart in the following step before you do pay.
If you’ve made several changes to your t-shirt exactly and finally got it exactly the way you want it and have been “adding it to your cart”, you may have several versions of it in your shopping cart.
To delete these unwanted tees before paying, simply click on the shopping cart icon in the top right corner. Click on “View Cart.” You will now see all of the versions of the shirt you have saved along with all of the specifications listed in detail.
Click on the quantity drop down button for the ones you want to get rid of and select quantity of “0” (zero) OR click on the little “x” next to the price of the tees you don’t want.

Shown: screenshot of checkout for Tees2urdoor.com
From here it’s easy-peasy. Enter your billing information, address and choose your shipping options.
Congratulations. You’ve chosen a style you like from our vast stock, you’ve personalized yourself some t-shirts with just a few clicks and at a bargain price!
The same steps apply to most of our other products when it comes to customization, such as our bucket hats, baseball caps, key chains, etc.

